Showing posts with label bread. Show all posts

Saturday, July 3

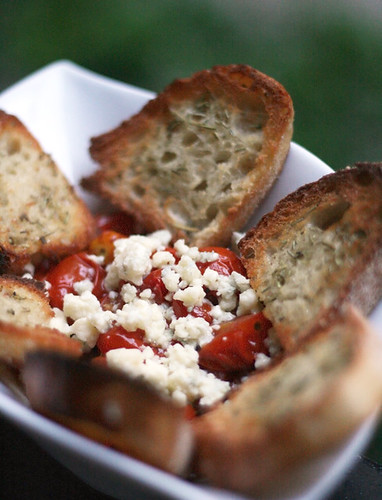
Tomato-Gorgonzola Bruschetta

tomato_1

Me and my friend were talking about bruschetta the other day. We were wondering — is bruschetta referring to the bread? or the topping? Should this post be named bruschetta with tomato & gorgonzola instead of tomato-gorgonzola bruschetta? If one of you knows, do share!

Either way, this is fantastic finger food. I especially love the tomatoes warm and collapsed on the crispy bread. Right before serving, I crumbled gorgonzola on top and lightly tossed so it'll slightly melt the cheese. Amazing!! As for the bread, I used up the ends of a sourdough loaf I use for sandwiches. Any bread will work. I put a pat of butter on each slice and sprinkled it with rosemary (I only had dried) and put it under the broiler for a few minutes. Please try this, its quick, delicious and definitely a crowd-pleaser.

tomato_2

Tomato-Gorgonzola Bruschetta
1 pint grape tomatoes
2 garlic cloves, minced
olive oil
salt 'n' peppa

1 Preheat oven to 450 degrees. Wash tomatoes and drain. Halve each tomato lengthwise and place on an aluminum foil covered baking sheet. Drizzle with olive oil, minced garlic, salt and pepper. Toss all together.
2 Bake for about 15 minutes until tomatoes have collapsed. Right before serving, crumble gorgonzola on top and lightly toss. Arrange the crispy bread around the tomatoes and serve.

Crispy Rosemary Bread
1 Slice bread and arrange on baking sheet. Put pat of butter on each slice and sprinkle with rosemary.
2 Broil for about 5 minutes until golden brown.

Saturday, January 23

Banana Bread with Chocolate

I recently bought "The Homemade Life" by Molly Wizenberg, the author of the blog Orangette. I was a big fan of her blog – simple photos, interesting compositions and witty writing. The book was no disappointment. Her recipes are woven throughout memories of her father and family. 've had banana bread before, but never like this. It is so moist, delicate and it doesn't scream banana, it is mild and delicious. This particular recipe originally included ginger, but I'm not a huge fan so I left it out. This was really easy, even for me, and lasts up to 5 days, covered in aluminum foil on the counter. It is especially yummy heated up in the toaster for breakfast. If you try it with ginger, let me know how it goes! Enjoy!


Banana Bread with Chocolate
6 tablespoons unsalted butter
2 cups unbleached flour
3/4 cup sugar
3/4 teaspoon baking soda
1/2 teaspoon salt
3/4 cup semisweet chocolate chips, or chocolate bar broken up into shards
2 large eggs
1 1/2 cups mashed bananas, about 3 bananas
1/4 cup well-stirred whole milk plain yogurt
1 teaspoon vanilla extract

1 Preheat oven to 350 degrees. Grease a standard loaf pan (9x5 in) with cooking spray.
2 Melt butter in the microwave. Set aside.
3 In a large bowl, whisk the flour, sugar, baking soda, and salt. Add the chocolate and whisk well to combine.
4 In a separate bowl, lightly beat the the eggs. Add the mashed banana, yogurt, melted butter, and vanilla. Stir to mix well.
5 Pour the banana mixture into the dry ingredients and stir gently. Do not overmix, but there should be no unincorporated flour.
6 Pour the batter into the prepared pan and smooth the top.
7 Bake 50 minutes to an hour until the loaf is a deep shade of golden brown. Cool the loaf for 5 minutes. Let it cool completely before slicing.
Note: Molly says this bread freezes very well, wrap it in plastic wrap and then again in aluminum foil.

Tuesday, January 12

OMG! Cinnabon Cake!

For some reason I've been gravitating toward baking recipes more and more. Ever since I made churros last week, I was like "Hm. I could do this!"  I realize the churros recipe last week was a simple recipe but it was huge for me. I think it's because I am buying new cookbooks and I always ignore the last third of the book – the dessert/baking chapter. It would be a waste of money not to use the whole book, right? Right. Well, I am definitely taking baby steps into the baking world and this cinnabon bread is the perfect recipe for an amateur baker like me. It was featured on kitchn.com, blogged by Framed. Since I looooove cinnabons, it instantly caught my eye. I'm so glad it ended up being a relatively simple and easy recipe (and I had most of the ingredients on hand, too!) This tastes exactly like a cinnabon you would have at the mall, icing and all! ooey gooey cinnamon-y delicious! Instead of individual cinnabons, it is one big cinnabon cake you can cut into and serve warm, drizzled with icing. Perfect for guests, if you don't eat it all first!

1 1/2 cups flour
1/3 cup sugar
1/2 tsp salt
4 tsp active dry yeast
2/3 cup warm milk
3 tbsp vegetable oil
1/2 tsp vanilla extract
1 large egg

Cinnamon topping
3 tbsp butter, room temperature
3/4 cup brown sugar
1 tsp ground cinnamon

Icing
1 cup powdered sugar
1-2 tbsp milk

1. Lightly butter a 8x8 round or square baking dish.
2. In a large bowl, combine flour, sugar and salt,
3. In a measuring cup, warm the milk and dissolve the yeast in the warmed milk. Stir in the vegetable oil, vanilla extract and egg into the same measuring cup and into the flour mixture.
4. Mix until smooth and pour into prepared dish. Let rest for 15 minutes.
5.  While the dough rests, mix together the butter, brown sugar and cinnamon in a small bowl until crumbly (I used my hand to mix together).
6. Sprinkle the brown sugar mixture over the dough and press lightly down into the dough.
7. Place pan into a cold oven and heat it to 350F. Bake for 30 minutes until set.
8. Cool for at least 30 minutes before whisking the icing.
9. Serve warm with lost of icing!

Monday, December 7

A French Snack

Have you ever heard of this snack? Baguette, slathered with butter, topped with radish slices and finished off with some sea salt? I've been seeing it around lately and decided I should see what all the hoopla is about. Apparently, it is a very popular snack or appetizer in France alongside a glass of white wine. My verdict? Very tasty, however I wasn't overwhelmed. It was great but I don't see myself preparing it again anytime soon. Compared to my favorite snack, I think mine wins! No recipe here, I think the photo is pretty self explanatory.

Now, guess what else! You see that fluffy bread in the photo? Well..... I made it! I baked my very own bread. I feel so accomplished :) I followed the "no-knead" bread baking recipe step-by-step, and it turned out fantastic! Here is the site I followed. No bread machine required, just time and a dutch oven (I used my crock pot bowl) and whoala! This is what came out of the oven:
Isn't it pretty? The crust is crispy and crunchy while the inside is moist and soft. I think next time I will add a little more salt. I can't wait to try other types of breads, like olive and sun dried tomato. Please check out the website and you'll be amazed at what a little time and yeast creates! One tip, make sure to use Instant yeast, otherwise it won't rise as needed. Let me know how it goes!